Every project involves collaboration. Whether you're working with fire rating consultants, project managers, or other external stakeholders, you need a way to share data and get feedback. But the traditional approach—exporting Excel files, emailing them back and forth, watching them get corrupted, then manually re-entering data into Revit—is fundamentally broken.
Channels changes all of that.
The Problem with Excel-Based Exchanges
Think about door schedules. They come up in every project. The typical workflow goes like this:
- Export an Excel file from Revit
- Send it to someone who knows about fire ratings
- They enter data in Excel—and inevitably mess it up (adding columns, adding rows, breaking formulas)
- Send it back to the architect
- The architect somehow needs to bring that information back into Revit (maybe with Dynamo scripts, maybe with PyRevit, maybe manually)
This isn't fixing a problem. This is working around a broken process.
We shouldn't be using Excel for this. There's a much better option.
What Are Channels?
Channels are versioned data exchange spaces that simplify collaboration between Revit users and external collaborators. Instead of emailing Excel files back and forth, you create a channel, publish your data, and let collaborators work directly in a simple, focused interface.
Channels understand BIM data structure. They know about types, instances, and how changes propagate. They provide 3D context so collaborators can see what they're working with. And they maintain a complete history of all changes, comments, and approvals.
How Channels Work: The Complete Workflow
Step 1: Prepare Your Data in Revit
Start with Vyssuals connected to Revit. Create a table focused on what you need feedback on—for example, doors with their fire ratings.
Pro tip: When sharing a model with external people, don't overwhelm them with too much data. Focus on what matters. Use the connector settings to sync only the relevant categories—maybe just doors, floors, roofs, and walls. This keeps the interface clean and focused.
Step 2: Create a Channel
Select your project and create a new channel. Name it by topic—"Doors" works well, though you can name channels anything that makes sense for your workflow.
Once created, the channel spins up on the server, ready to receive data.
Step 3: Publish Your First Snapshot
With your table selected, create a snapshot. This is version one—the starting point for your collaboration.
Here's where Channels get smart: You choose which columns should be editable for the external collaborator. In our door schedule example, you might make only the fire rating column editable. The type name column stays visible for reference, but it's read-only.
Click publish, and Vyssuals:
- Grabs the 3D geometry from your Revit file
- Publishes the data to the server
- Creates a versioned snapshot that external collaborators can access
Step 4: Share the Channel
To share a channel with an external collaborator, go to the manage icon and add their email address. Copy the link and send it to them via email, Teams, or whatever communication method you use.
They get access to a focused, simple interface—no Revit required, no Excel required, just the data they need to work with.
Step 5: External Collaborators Work in the Channel
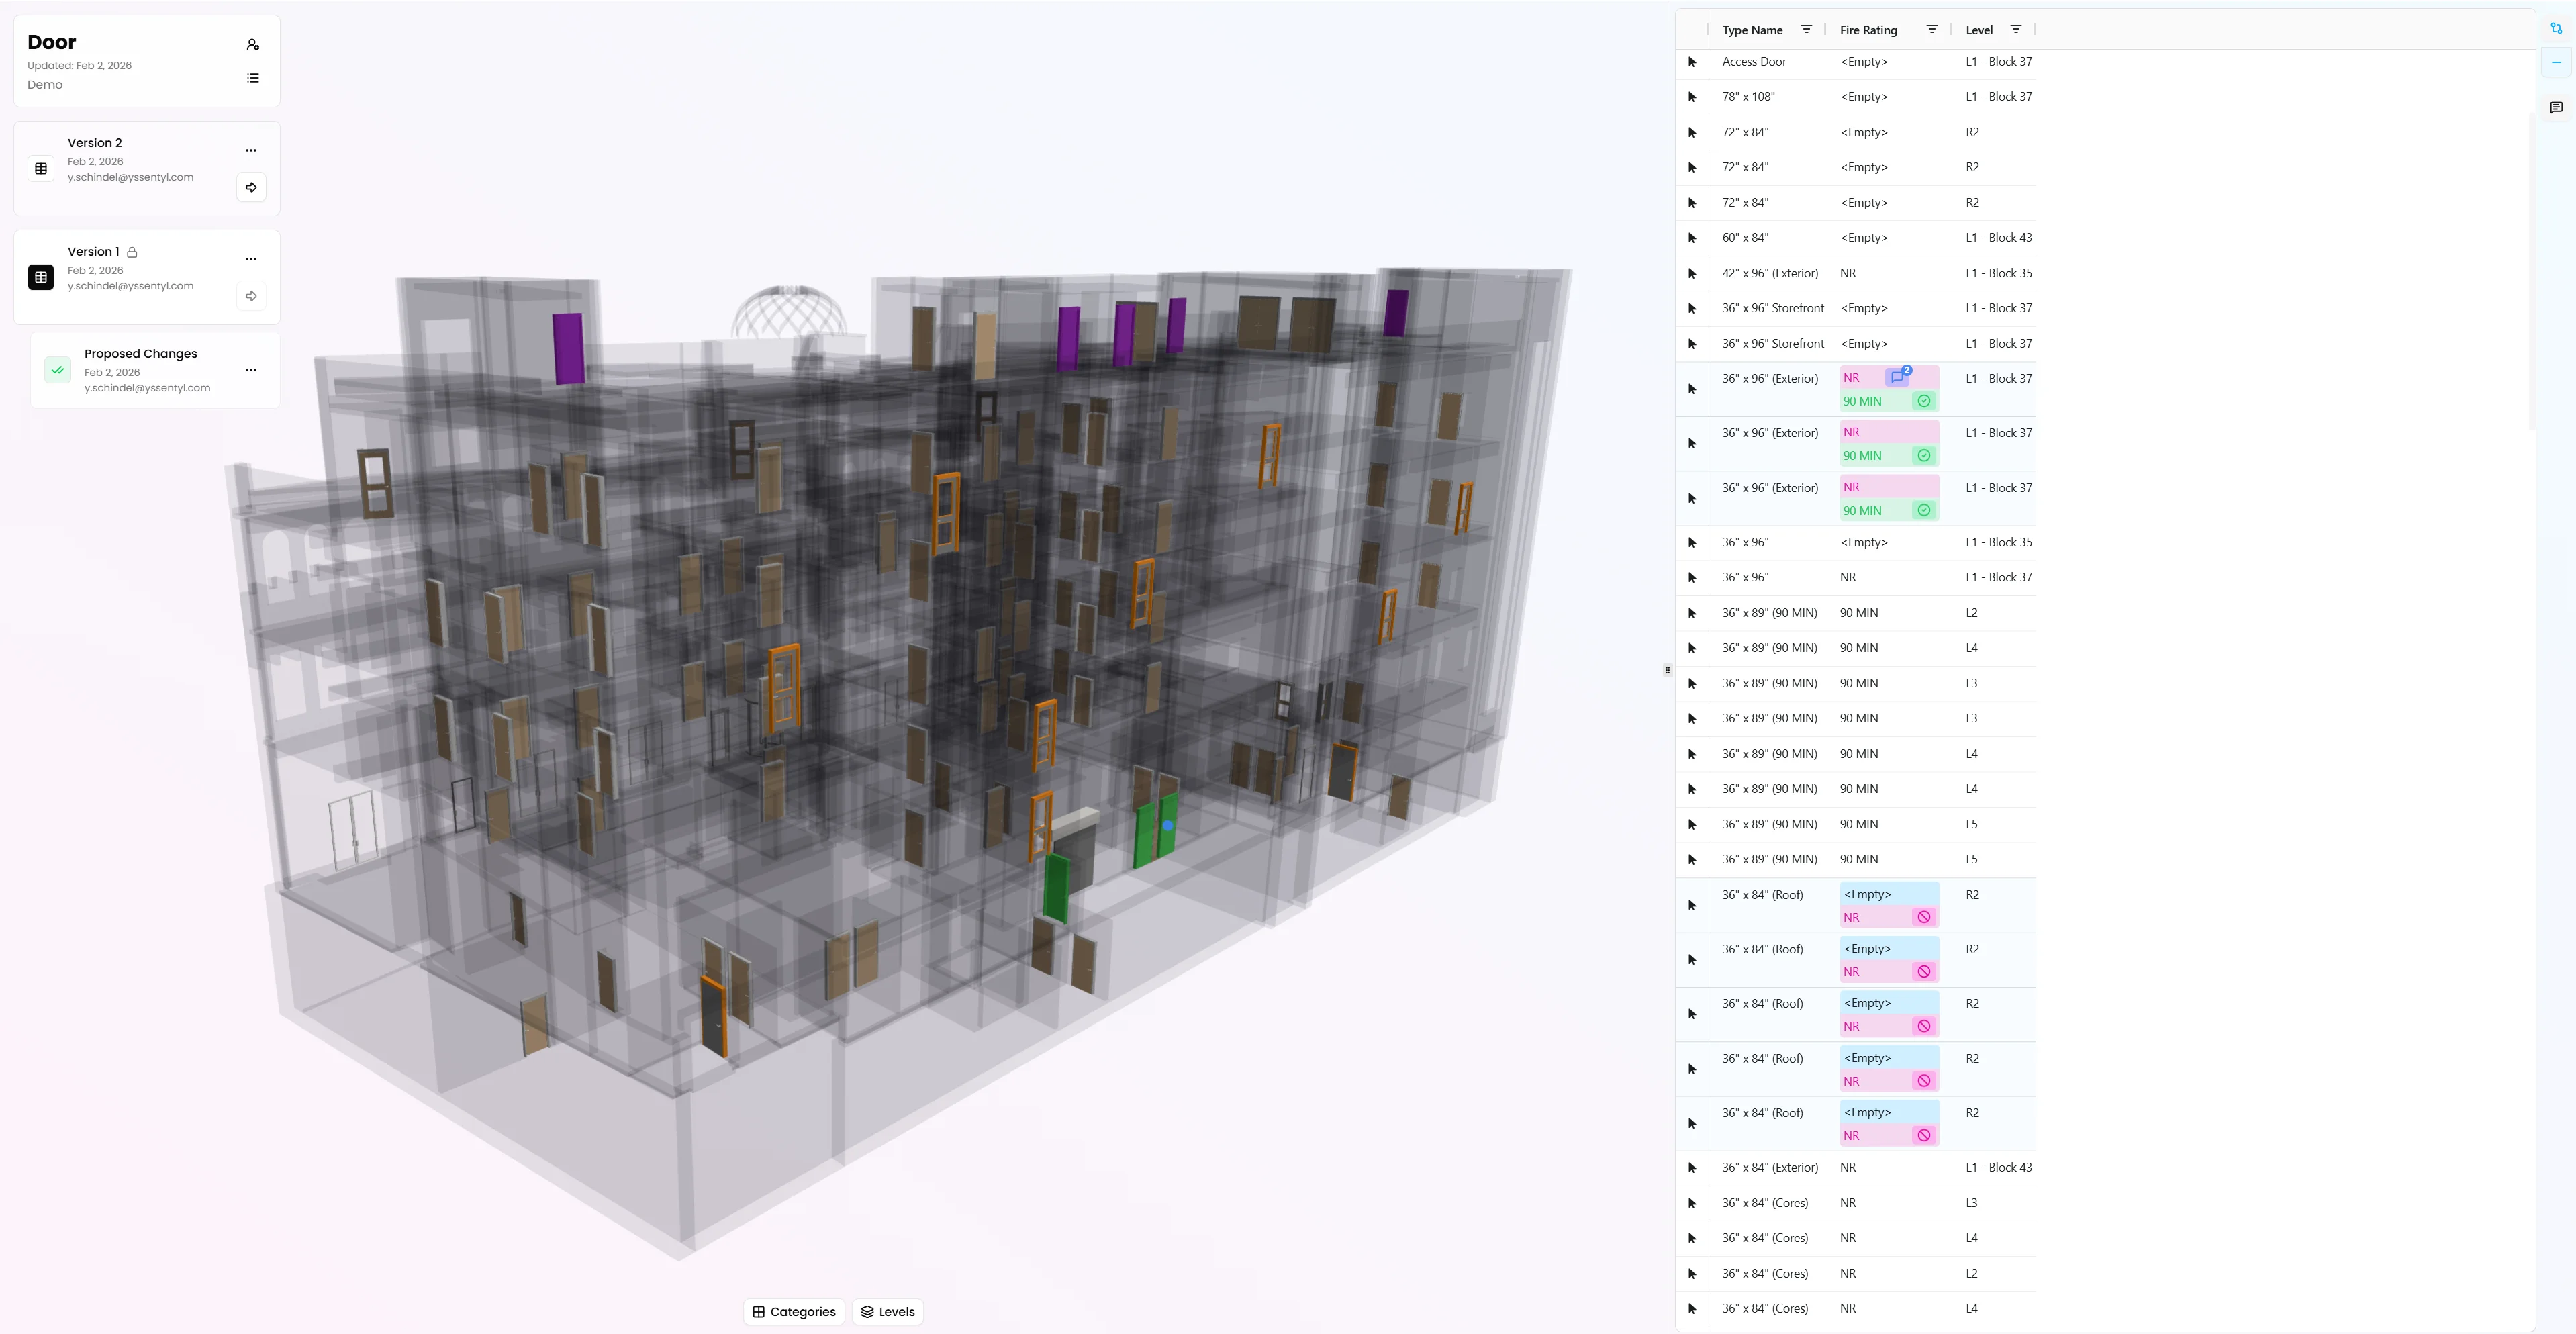
When you view the channel, it opens independent from Revit. It's loading data from the server, not from the live Revit model.
The interface is intentionally simple. This isn't for Revit experts—it's for project managers, fire rating consultants, or anyone who needs to enter information but doesn't need the complexity of Revit.
They see:
- A 3D view showing the elements they're working with
- A table with editable columns
- Version information showing which snapshot they're viewing
As they make changes, those changes propagate correctly. If they change a fire rating for a door type, it updates all instances of that type—because Channels understand type parameters. This is one of the big advantages over Excel-based exchanges: Channels know about BIM data structure.
The 3D view shows which elements have changes attached to them, providing immediate visual feedback.
Step 6: Comments and Collaboration
If a collaborator isn't sure about something, they can add a comment. Comments are versioned—they tell you:
- What version of the data the comment was attached to
- The value that was in Revit
- The suggested value
This creates a conversation thread around specific data points, making it clear what needs discussion.
Step 7: Submit Changes for Review
When collaborators are done, they can change the status of their changes to "pending review." This is optional, but it gives architects a heads-up that feedback is ready.
Then they use whatever communication method your project uses—a call, Teams message, or email—to let you know they're ready.
Important: Channels don't send emails on your behalf. You stay in control of communication.
Step 8: Review and Approve Changes
Back in Revit, you can load all the information from the channel.
Click "pull changes" to bring the proposed changes into your dashboard. This recreates the table you used to upload data (in case you lost the original), and you can filter to show only rows with changes attached.
You can:
- Color Revit according to proposed changes to see what would change
- Review comments and respond to questions
- Approve or reject changes individually or all at once
When you're ready, click "send approved changes to Revit." Approved changes turn green once they've been successfully integrated.
Step 9: Update Status and Lock Snapshots
Update the status of changes to "reviewed" in the channel. This puts red and green markings on changes so collaborators can see what made it into Revit and what didn't.
Lock the snapshot that these changes were created on. This prevents collaborators from entering new changes while you've already dealt with them, avoiding confusion and conflicts.
Step 10: Publish Updated Data
Create a new snapshot—version two—that reflects the current state of your Revit file. This gives collaborators an updated baseline to work from.
In the channel, you can refresh to see version two. If you want to look back at history, use the list icon to go back in time and see how changes evolved. The 3D view colors elements according to what happened—green for changes that made it into Revit, purple for rejected changes.
Why Channels Are Better Than Excel
Structured Exchange
Channels provide a structured, versioned exchange. You decide what information collaborators get and what they can change. There's a clear workflow: upload data, get feedback, incorporate changes, upload new data.
BIM-Aware
Channels understand BIM data structure. They know about types and instances. Changes propagate correctly. This knowledge about type information is a huge advantage over Excel-based exchanges.
3D Context
Collaborators can see what they're working with in 3D. They can filter, turn off categories, focus on specific levels. This is a full-featured viewer that helps them make better decisions.
Complete History
Every change, every comment, every approval is tracked. You can go back in time to see how data evolved. This creates an audit trail and helps resolve questions about what changed and when.
No Data Corruption
Excel files get corrupted. Columns get added. Rows get added. Formulas break. Channels eliminate all of that. The data structure is controlled, and changes are validated.
Simple for Collaborators
The channel interface is intentionally simple. It's designed for people who don't work in Revit—project managers, consultants, external stakeholders. They don't need to learn Revit or Excel. They just need to enter information.
What This Means for Your Workflow
Channels transform how you collaborate on BIM data. Instead of fighting with Excel files and manual data entry, you get:
- Structured collaboration with clear workflows
- Versioned exchanges that maintain history
- BIM-aware data handling that understands your model structure
- 3D context that helps collaborators make better decisions
- Complete control over what information is shared and what can be changed
This is a big level up from the Excel-based approach. Much more structured, much more controllable, and much more efficient.
Want to see Channels in action? Check out our tutorial videos or get started with Vyssuals today.