Revit type parameters are powerful because they keep repeated elements consistent. They are also one of the places where data exchange between engineers and BIM modelers can become awkward very quickly.
A common setup in engineering firms looks like this:
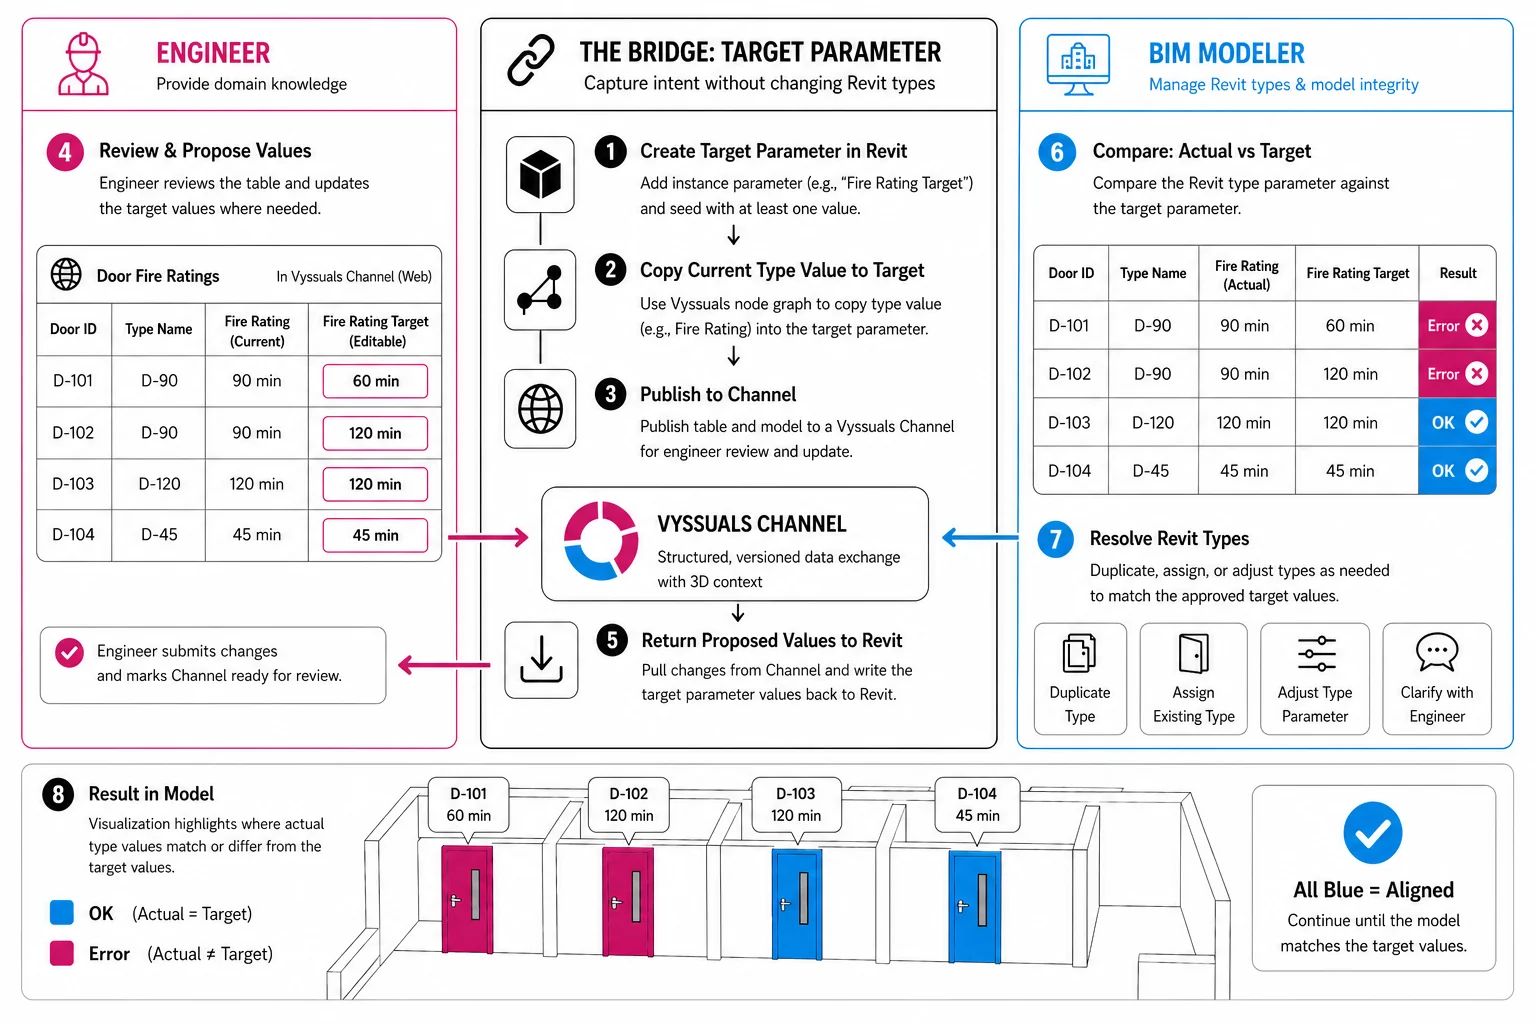
- BIM modelers control the Revit model, type structure, and company standards.
- Engineers provide domain knowledge and know what values need to change.
- The data has to move between both sides without breaking the model.
The friction appears when an engineer wants to change something that is stored as a type parameter. From the engineer's point of view, they may only be changing a value on one element. From Revit's point of view, that value may belong to a type, which means changing it could affect many elements at once.
If the change should only apply to one element or a subset of elements, the BIM modeler may need to duplicate or split the Revit type. That is real modeling work. It has to respect naming conventions, type structure, annotations, schedules, and company standards.
The engineer should not have to think about any of that.
Separate the Target Value from the Revit Type
The useful pattern is to separate the value the engineer wants from the type parameter that currently exists in Revit.
In this workflow, the engineer does not edit the real Revit type parameter directly. Instead, the BIM modeler creates a temporary instance parameter, such as Fire Rating Target, and copies the current type value into it.
That target parameter becomes the place where the engineer can propose changes.
The actual type parameter stays under the control of the BIM modeler. The target parameter captures intent.
This gives both sides what they need:
- The engineer gets a simple table where they can enter the correct values.
- The BIM modeler keeps responsibility for the Revit type structure.
- The model can clearly show where the current Revit value does not match the requested target value.
Example: Door Fire Ratings
Door fire ratings are a good example because they often sit directly at the boundary between engineering input and Revit type management.
An engineer may know that one door needs a 60 minute rating and another needs a 120 minute rating. They should be able to provide those values directly.
But in Revit, the fire rating may be stored on the door type. If two doors share the same type, changing the type fire rating changes both doors. If the two doors need different ratings, the BIM modeler needs to split the type or assign a different type.
That distinction is exactly why the workflow uses a target parameter.
The engineer works with the target value. The BIM modeler resolves the type structure afterward.
Step 1: Create a Target Parameter in Revit
Start by creating a temporary project parameter in Revit.
For the door example, the parameter could be called Fire Rating Target.
This parameter should be an instance parameter, because the goal is to let target values vary per element. It does not need to be part of the permanent company standard. It is simply a temporary exchange parameter that helps move proposed values through the workflow.
Once the parameter exists, add at least one value so Vyssuals can pick it up during sync.
Step 2: Copy the Current Type Value into the Target Parameter
Next, use the Vyssuals node graph to copy the current Revit type value into the new target parameter.
At a high level, the graph does this:
- Load the relevant elements, such as doors.
- Select the existing type parameter, such as
Fire Rating. - Select the new target parameter, such as
Fire Rating Target. - Use a formula node to copy the fire rating value into the target column.
- Use a create changes node to review and write those target values back into Revit.
The important safety detail is that the graph does not write to Revit while you are building it. You can preview the transformed table first. When the result looks correct, you explicitly create and apply the changes.
After this step, every relevant element has a target value that matches the current type value.
That gives the engineer a clean starting point.
Step 3: Publish the Target Values Through a Channel
Now the BIM modeler can create a table for the engineer.
For the door example, the table might include:
- Door identifier
- Type name
- Current fire rating
- Fire rating target
Only the target parameter should be editable. The other columns are there for context.
Then publish the table and model geometry to a Vyssuals Channel. The Channel gives the engineer a web-based interface where they can review the elements, see the 3D context, and edit the target values without opening Revit.
This is the key difference from sending an Excel file around. The engineer is not editing an unstructured export. They are editing a controlled set of values in a versioned data exchange space.
Step 4: Let the Engineer Propose Values
From the engineer's side, the workflow is intentionally simple.
They open the Channel, review the table, and update the target values where needed. If one door should be 60 minutes and another should be 120 minutes, they edit those cells.
Because the target value is stored as an instance parameter, the engineer can propose different values for individual elements without accidentally changing every element of the same Revit type.
Once the engineer is done, they mark the Channel as ready for review.
At this point, the engineer has provided their domain input. They do not need to understand type duplication, Revit parameter binding, family behavior, or office naming standards.
Step 5: Bring the Proposed Values Back into Revit
The BIM modeler can now pull the Channel changes back into Vyssuals and write the target values into Revit.
Because the target parameter is temporary and designed for this workflow, these changes can be accepted as the proposed target state. The actual Revit type parameter still has not been changed.
That distinction matters.
You are not blindly applying engineering input to the type system. You are bringing the engineer's requested values into the model as a comparison layer.
Step 6: Compare Actual Values Against Target Values
Once the target values are back in Revit, the BIM modeler can build a second graph to compare the actual Revit type parameter against the target parameter.
For each element, the graph checks:
- Does
Fire RatingequalFire Rating Target? - If yes, mark the result as
OK. - If no, mark the result as
Error.
That result can be used to color the model.
Elements where the current type value matches the target value are fine. Elements where the values differ are the places where the BIM modeler needs to act.
This turns a vague coordination problem into a clear model-based checklist.
Step 7: Resolve the Revit Types
The final step belongs to the BIM modeler.
If a door has a current fire rating of 90 minutes but the target value is 120 minutes, the BIM modeler can decide how to resolve it properly. That may mean duplicating a type, assigning an existing type, adjusting the type parameter, or checking whether the proposed engineering value needs clarification.
This is exactly where Revit expertise should be applied.
The engineer provided the target. The BIM modeler decides how that target should be represented in the Revit type structure.
The model visualization makes the process manageable: keep working through the mismatches until everything turns green.
Why This Workflow Works
The workflow works because it avoids putting the wrong responsibility on the wrong person.
Engineers should provide the values they know. BIM modelers should manage the technical Revit consequences of those values.
Target parameters make that separation explicit. Channels make the data exchange structured and reviewable. The node graph makes the copy, compare, and visualization steps repeatable.
Instead of asking engineers to understand Revit type behavior, you give them a simple table. Instead of asking BIM modelers to interpret scattered comments or broken Excel files, you give them target values directly inside the model.
That is a much cleaner handoff.
When to Use This Pattern
This pattern is useful whenever external or non-Revit users need to propose values that may eventually affect Revit type parameters.
Common examples include:
- Door fire ratings
- Acoustic ratings
- Security classifications
- Hardware groups
- Asset or facility management classifications
- Sustainability or compliance properties
- Any value where user intent and Revit type structure should remain separate during review
The exact parameter names will change by project. The principle stays the same:
- Copy the current controlled value into a target field.
- Let the right person edit the target field.
- Bring the target value back into the model.
- Compare target against actual.
- Let the BIM modeler resolve the Revit structure.
A Better Data Exchange Contract
The target-value pattern creates a better contract between engineers and BIM modelers.
The engineer is not saying, "Please change this Revit type."
They are saying, "This element should have this value."
That is the right level of abstraction for collaboration. It captures the design or engineering intent without pretending that the external reviewer should also make Revit modeling decisions.
Vyssuals then provides the bridge: a node graph for transforming and comparing the data, Channels for structured external input, and model visualization for resolving the result.
The outcome is a workflow where type-parameter changes stop being a messy handoff and become a controlled review process.