Rule Charts in Vyssuals transform how you validate your Revit models. Instead of manually checking hundreds of elements or relying on generic Revit warnings, you can create custom validation rules that test exactly what matters for your project. Whether you're ensuring bedroom areas meet social housing requirements, validating fire rating consistency, or checking that your door schedules are correct, Rule Charts give you the power to catch issues before they become problems.
What Are Rule Charts?
Rule Charts are specialized validation tools in Vyssuals that test your model data against custom criteria. Think of them as automated quality control inspectors that never get tired and never miss details. They work by applying logical tests to your Revit data and presenting the results in clear, visual donut charts that show you exactly what passes and what fails your validation rules.
The beauty of Rule Charts is their flexibility. You're not limited to predefined checks - you can create rules for any parameter, any condition, and any element type in your model. This means your validation rules can match your specific project requirements, company standards, or client expectations.
How Rule Charts Work
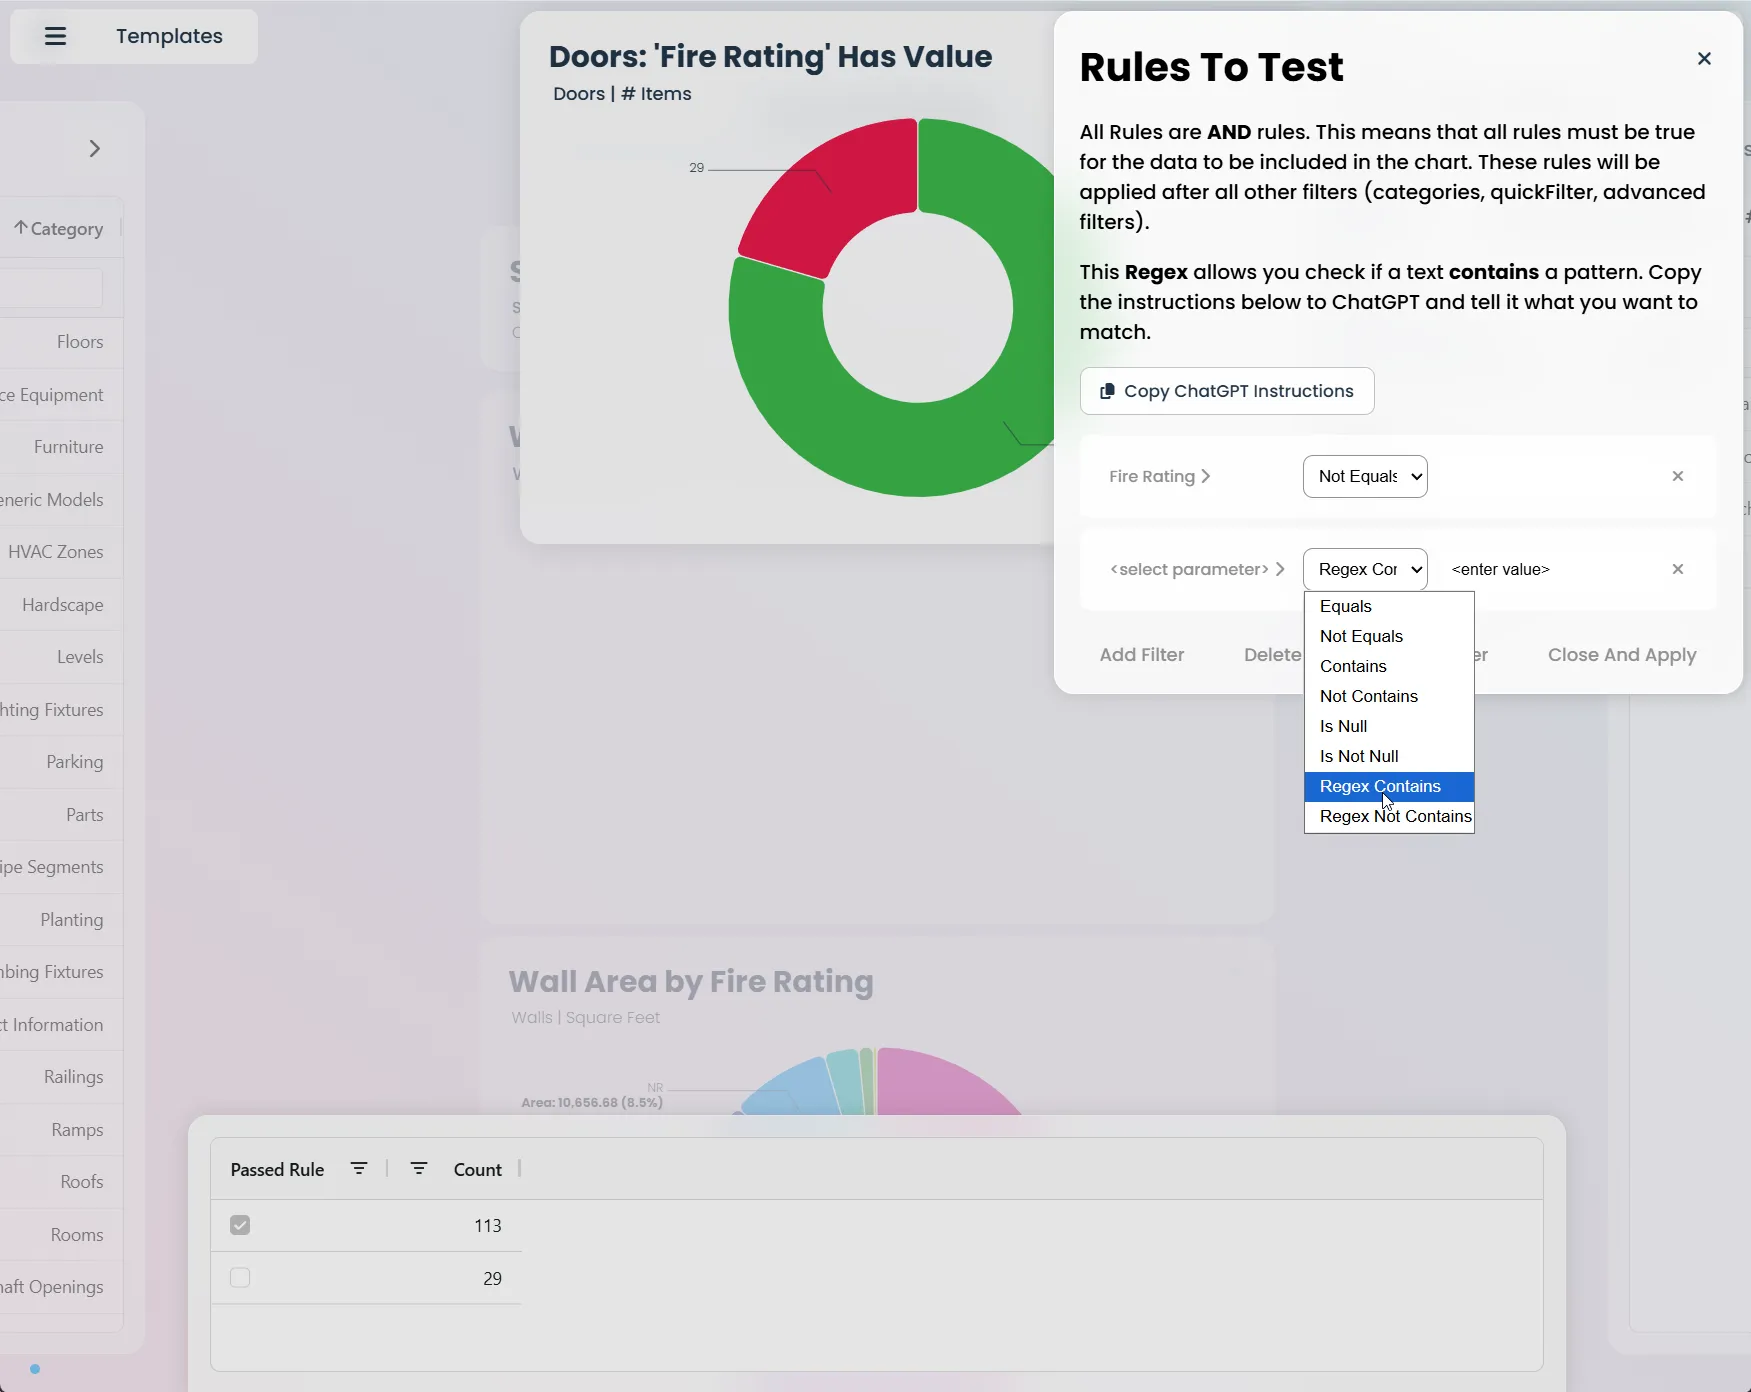
Rule Charts operate on a simple but powerful principle: they take your Revit data, apply your custom validation rules, and categorize every element as either "Passed" or "Failed." The visual result is a donut chart where green represents elements that meet your criteria and red shows elements that need attention.
The Rule Chart Interface
When you create a Rule Chart, you'll see three main components:
- Setup Instructions: When no rules are configured, you'll see clear guidance on how to set up your first validation rule
- Single Rule Display: For one rule, you get a focused donut chart showing pass/fail results
- Multiple Rule Grid: For multiple rules, you see both a combined view and individual rule breakdowns
The interface adapts to your needs. Start with one rule to understand the concept, then add more rules as your validation requirements grow.
Rule Configuration Process
Setting up a Rule Chart follows a logical three-step process:
- Filter by Category: Choose which element types to validate (e.g., Rooms, Walls, Doors)
- Add Advanced Filters: Narrow down to specific elements (e.g., room name = "Bedroom")
- Set a Rule to Test: Define your validation criteria (e.g., Area > 10)
This process ensures you're testing exactly the right elements with exactly the right criteria.
Common Validation Rules for Different Disciplines
Architectural Validation Rules
Room Area Validation
- Social Housing Projects: Bedroom areas must be greater than 10m²
- Office Buildings: Meeting rooms must be between 12-25m²
- Healthcare: Patient rooms must exceed 20m² for accessibility compliance
Door Schedule Validation
- Fire Rating Consistency: Doors with fire rating x must have automatic closure device y
- Emergency Exits: Escape doors widths must be at least 90cm
- Parameter Dependencies: Doors with value x in parameter y must have value a in parameter b
Wall Property Validation
- Location Line Consistency: Exterior walls should use "Finish Face Exterior" location lines
- Base Constraint Analysis: Walls should be properly attached to appropriate levels
- Type Naming Convention: Type names must follow established naming patterns using regex validation
Structural Engineering Validation Rules
Load-Bearing Wall Validation
- Structural Material Assignment: Load-bearing walls must have appropriate structural material
- Foundation Connection: Load-bearing walls must have base offset 0
Element Classification Rules
- Structural vs. Non-Structural: Clear distinction between load-bearing and partition elements
MEP Design Validation Rules
System Classification Validation
- Parameter Completeness: MEP elements must have required system classification parameters
- System Organization: Elements must be properly assigned to appropriate systems
Type Name Validation with Regex
Rule Charts can validate type names using regex patterns to ensure compliance with your chosen classification system. For comprehensive guidance on choosing the right classification strategy for your organization, see our Type Classification Strategies Guide.
Basic Regex Patterns for Common Classification Systems
Germany (DIN 277) Format:
^[0-9]{3}_.*$ # 3 digits underscore free text
Switzerland (EBKPH) Format:
^[A-Z][0-9]{2}.[0-9]{2}_.*$ # Letter + 2 digits dot 2 digits underscore free text
Getting Help with Regex Patterns
Need help creating regex patterns for your specific classification system? We're happy to provide support! Whether you're working with international standards like DIN 277, EBKPH, or custom company naming conventions, our team can help you develop the right regex patterns for your validation rules. Don't hesitate to reach out if you need assistance with pattern syntax or want to discuss your specific validation requirements.
Setting Up Type Name Validation
- Create a Rule Chart for type name validation
- Filter by Category (e.g., Walls, Doors, Windows)
- Add Advanced Filter for Type Name parameter
- Set Rule to Test using regex pattern
- Configure Pass/Fail Logic based on pattern matching
Example Rule Setup:
- Category: Walls
- Filter: All walls
- Rule: Type Name matches pattern
^C02.[0-9]{2}_.*$ - Result: Shows which walls follow the EBKPH wall construction classification
Step-by-Step Workflow for Rule Checking
Step 1: Identify Your Validation Needs
Before creating any rules, think about what problems you're trying to solve. Are you checking compliance with building codes? Validating against client requirements? Ensuring consistency across your team's work?
Common validation scenarios include:
- Project Milestone Reviews: Comprehensive checks before client presentations
- Weekly Quality Control: Regular monitoring of model health and consistency
- Team Training: Helping new team members understand quality standards
- Contractor Deliverable Validation: Ensuring all requirements are met before handover
Step 2: Set Up Your First Rule
Start simple with one rule to understand the process:
- Add A Chart by clicking '+' in the top right corner
- Select Rule Chart as your chart type
- Choose Your Category: Start with Rooms for area validation
- Add a Filter: Specify which rooms to check (e.g., room name contains "Bedroom")
- Set Your Rule: Define the validation criteria (e.g., Area > 10)
- Test and Refine: Run the rule and adjust as needed
Step 3: Interpret Your Results
Rule Charts present results in clear visual format:
- Green (Passed): Elements that meet your criteria
- Red (Failed): Elements that need attention
- Counts and Percentages: Exact numbers for each category
- Interactive Selection: Click on failed elements to see them highlighted in Revit
Step 4: Take Action on Results
When you see failed elements:
- Click on the red section to select failed elements in Revit
- Review the specific issues in the Revit model
- Make necessary corrections to bring elements into compliance
- Chart Autmatically Refreshes so you can verify fixes immediately
Step 5: Build Your Validation Dashboard
As you create more rules, organize them into a comprehensive validation dashboard:
- Group related rules together (e.g., all room validation rules)
- Create templates for different project types
- Share with your team for consistent quality control
- Schedule regular reviews to maintain standards
Advanced Rule Chart Features
Multiple Rule Management
When you have multiple validation rules, Rule Charts automatically create both combined and individual views:
- Combined View: Shows overall pass/fail status across all rules
- Individual Views: Separate charts for each rule, making it easy to identify specific issues
- Grid Layout: Organized display that scales with your rule count
Cross-Filter Integration
Rule Charts integrate seamlessly with other Vyssuals features:
- Color Synchronization: Send validation results to Revit for visual feedback
- Element Selection: Click on chart sections to select elements in Revit
- Cross-Chart Filtering: Use results from one chart to filter other charts
Template Integration
Save your validation rules as templates for reuse:
- Project Type Templates: Different validation sets for different project types
- Team Standards: Consistent validation across all team members
- Client Requirements: Custom validation for specific client needs
Conclusion
Rule Charts in Vyssuals transform model validation from a manual, error-prone process into an automated, reliable system. By creating custom validation rules that match your specific project needs, you can catch issues early, maintain consistent quality, and ensure compliance with requirements.
The key to success with Rule Charts is starting simple and building complexity over time. Begin with one critical validation rule, understand how it works, then gradually add more rules as your needs become clear. Remember that the best validation rules are those that solve real problems in your workflow.
Whether you're an architect ensuring room areas meet client requirements, a structural engineer validating load-bearing elements, or a BIM coordinator maintaining team standards, Rule Charts give you the tools to maintain quality control at scale.
Ready to start validating your models? Open Vyssuals, create your first Rule Chart, and discover how automated validation can improve your BIM workflow.
This feature is available in Vyssuals Revit Connector 0.5.0 and later. For more information about the recent updates, check out our Major Update August 2025 blog post.